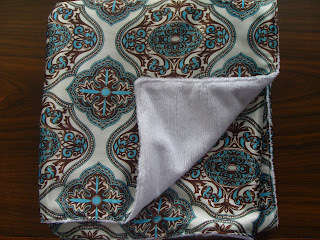
Using the tutorial on Prudent Baby, I whipped up this stylin' cool sheet my little Man's portable crib today. This was a quick little project completed at lunch time. I picked up the fabric in the remnants bin over at M&L a few months back and didn't know what I was going to do with it. It just so happen to be the exact measurement for this project. All I had to cut was the corners!
Showing posts with label Baby. Show all posts
Friday, September 10, 2010
Stylin' Cool Sheets
Using the tutorial on Prudent Baby, I whipped up this stylin' cool sheet my little Man's portable crib today. This was a quick little project completed at lunch time. I picked up the fabric in the remnants bin over at M&L a few months back and didn't know what I was going to do with it. It just so happen to be the exact measurement for this project. All I had to cut was the corners!
Wednesday, April 21, 2010
Pinafore Take 2
I finished sewing the 2nd pinafore from these fab KoKo japanese fabric. I love the little faries...I think it's Peter Pan and Tinkerbell. What do you think? I love how these turned out.
Friday, April 16, 2010
Pinafore
I made this pinafore dress/top last night using the beautiful mermaid fabric I picked up earlier in the week. I didn't make it reversible this time, just lined with white gauzy material so it stays light for spring and summer wear. I was a little concerned at Purl Soho about the texture of the fabric - it's double layered gauze and it felt kind of stiff. But the gal there re-assured me that it would soften up after a wash. I always wash my fabric before use on each project. She was right, it was ultra soft after wash. Prefect for being next to baby's skin. I bought more than I need, so I think I'll be making a tank top for the Piggie too.
Thursday, April 15, 2010
Pack N Play Sheet
The Little Man has graduated from bassinet to Pack N Play, actually he's in the Mini Arm's Reach Co-Sleeper. It was a hand-me-down from a friend - THANKS to Katherine's cousin : ) I already have a sheets for crib, bassinet and Pack N Play, unfortunately, none fits the Mini. Here's a quick turtorial on how make one of your own.
1. Take measurements of your mattress and add 6. My mini measures 31 x 18 = 37 x 24.
2. Cut your fabric based on the calculation above.
Thursday, April 8, 2010
Seat Belt Covers
My daughter complains about her seat belt rubbing against her chest and neck. We usually just pull her shirt up or turn her collar up to protect her skin. I finally had an ah ha moment and made her a set of seat belt covers. This was a quickie accomplished over lunch.
These are for my daughter
What you'll need:
2pcs of each - 5 1/2 x 4 flannel (or any other fabric you like), batting, double sided quilted fabric (you can double up on the batting if you want to use another fabric).
6 in of velcro
Thread
Lay the flannel wrong side down, then quilted fabric, and batting. Sew around (1/4 in seam) leaving a 2 inch open to turn inside out. Clip corners and turn inside out. Sew 2 inch opening shut. Attach velcro and you're done!
I made made another set for my son using 5 1/2 x 5 measurements instead.
***Update*** - For adult sized, use 7.5 x 7.5 squares.
Tuesday, March 23, 2010
Baby Sling II
Finished a baby sling as a gift in under 1 hour today. I used this tutuorial, which is the same one I used for my first sling. There's an un-line version or the double sided reversable version. I made the latter. Although blue and brown is a bit cliche for a baby boy, I thought the damask pattern and dots give it a nice hip and modern feel.
I used scraps from the excess seams and made a braided necklace...an idea from here. Or I guess it can also be a wrap bracelet.
Monday, March 22, 2010
Baby Wash Cloth
For the baby shower I'm throwing for my co-worker next month, this is the first of a few hand made items I'm giving her. Her son's room will have a safari theme and I thought this flannel print at JoAnn's was very appropriate. I simply cut 2 11 x11 squares from a flannel and terry cloth (both can be found a JoAnn). Stitch around the sides, turned inside out and top stitched for a nice finished look. I bundled the 2 together with a ribbon. In all, it took less than 1/2 hour from start to finish.

Monday, March 1, 2010
Embelished Tops
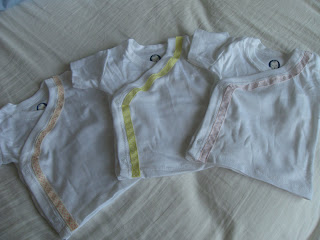
I didn't have a chance to post my ribbon embelished tops I gave to Amy for her baby girl due in 3 weeks. I did one trimming the edge. The other one I sewed the ribbon next to each button on the side and tied them into bows. I like how it looks like a faux kimono. I'm going to do the same thing to the sleeves of a tank top for my daughter this spring/summer...how sweet will that be!
Wednesday, February 24, 2010
MIA
Wow have 2 kids really cut into me time and especially my crafting time. I know as they get older, I might be able to get some of that back. In the meantime, between kids, work, gym (I'm training for a 1/2 marathon in Newport Beach in May!), and house work - I'm averaging about 1 project every 2-3 weeks : ( And my list of to do keeps growing! This month MADE and Made by Rae are celebrating boys...so I've added a ton more stuff to do. Plus I'm scouring the web for ideas for my co-worker's baby shower I'm hosting. That said, I've got my work cut out. I have a surprise baby shower this weekend so I made a baby blanket yesterday during my lunch break. I love this teal and brown print for a girl.
In addition, I'm adding some embleshments on to baby wrap shirts like these using red & yellow ribbons.
Thursday, November 12, 2009
Personalized Baby Shirts
With a little less than 4 weeks more to go, I wanted to tackle a couple projects for my little guy. This was a quick and easy way to personalized plain white side snap shirts. I did the first one with his initial. The second one is just a ribbon trim. I don't like the way the zig zag turned out on the initial one. I think in the future I'll iron on applique it first and then top stitch around it.
Wednesday, October 21, 2009
Iron On Vinyl
If you haven't done so, iron on vinyl is super fun to work with. You can transform any fabric into waterproof vinyl! I got mine from Joann's by Therm O Web. It comes in a roll 17' x 2yds. I don't know what happened to the changing pad we used to have. I used this to make a replacement. All I did was cut fabric and batting 14 x 24. I used 2 different fabrics so I know which side I use for child and which for icky surfaces. Iron on the vinyl before sewing. Pin batting, fabric 1 with vinyl side up and fabic 2 with vinyl side down. Stitch all around leaving approximately 2 inches gap to turn inside out. Then top stitch all around again. I didn't bother with putting any closures on it, since it travels in the diaper bag. Here's some not so great pics:
Some other suggestions for projects: bibs, make up bags, placemats, coasters, book covers, lunch bags...endless!
Saturday, September 19, 2009
Purse and Blanket
Made by Rae posted this free pattern on her blog. It's been referenced to by a number of different blogs I read and so I thought to give it a try. I found the fabric in the remnants bin at Joann's for $5 and used my left over materials for the liner. I also used interfacing to give it more structure. I turned out great. The pattern is super easy to follow along...I'm thinking of people I can make this for a gift. Lisa thought it was lame when I was putting it all together, but agreed it's way cute with the finished product.
Fairly last minute, the hubby informed me that we're going to a baby shower for a former co-worker. I whipped up this modern dot satin and white minky backed blanket. Hope they like it.
Tuesday, September 8, 2009
Completed Pillow
I finished my bedding set for baby boy. Here's the pillow to compliment the bumper and bed skirt. I love how it all turned out. Thanks again to Lisa for helping me finalize the fabric selection and color scheme.
Completed Bedskirt
I've completed the bed skirt that matched my simply modern baby bumper. We currently have the crib set up as a toddler bed, so I can't get the full effect of how it looks. Here's a picture of it hanging on the ironing board. I'm very happy with the way it turned out. My measurements slightly off for the front and back, but no biggie.
Monday, August 24, 2009
Minky Blankie
Baby Crib Bumper
In search of baby boy bedding, I decided to make my own. I really didn't like anything at the retail stores. What's being mass produced is just to kiddie for me. Plus they want a fortune for poor quality. The ones I do like at boutique stores, I can't justify paying $300+. Then I cam to realization that in Amy Butler's Little Stitches, there's a pattern for a modern crib set.
I spent a couple days scouring the Internet for other patterns to for ideas. Then after a couple trips to the fabric store, Joann's and M&L, I had a better idea of what I wanted to do. With the help of my sister, we picked out a nice print pattern for the interior and the exterior multi-tone cotton pique. The pique really adds to the luxurious feel to the end result. I added a grosgrain brown ribbon and piping to finish it off.
Although the pattern is based on Amy Butler's, I basically used her pattern as a guide and made up the rest on my own. Initially, there was no intention to make the ties out of the same interior fabric, but I didn't buy enough ribbon to go all the way around. I was too anxious to finish the project over the weekend and didn't want to have to go back to the store to pick up the shortage. In the end, I think it looks better this way.
Basically my pattern consists of:
2 - 55 x 11 3/4 panels for the interior front & back
2 - 27 1/2 x 11 3/4 panels for the interior sides
2 - 2 1/2 packets of piping
16 - 2 x 22 strips for ties
2 - 2 x 4 strips for loops to hold together
2 - 55 x 8 yellow pique for front & back
2 - 55 x 3 3/4 white pique for front & back
2 - 27 1/2 x 8 yellow pique for sides
2 - 27 1/2 x 8 white pique for sides
4 yards of brown grosgrain ribbon - I was short and didn't add ribbon to the back panel. I'd probably need 5.5 - 6 yrds to include it.
1 package of baby bumper pads from Nu Foam - I ordered it online at Joann's.
1. Sew all interior panels together. Long, short, long, short with 1/2 seam. Press seams open
2. Sew yellow and white pique together with 1/2 seam. Press seams open
3. Attach ribbon onto each panel centered on the exterior seam where the 2 tones meet.
4. Attach exterior panels together, long short, long, short with 1/2 seam, press seams open - make sure you align the ribbon at the seam.
5. Iron and fold strips into bias and stitch along the opening. Or use ribbon or pre-made bias tape instead for ties.
6. Pin interior and exterior panels together - right sides facing each other. Pin pipping in between the 2 with piping cord inside the right sides. Pin ties at seams inside the panels and at 27 1/2 inches on the long panels. My crib has a decorative panel in the middle, so I measured to the spindle in the middle next to it. Pin loop on to one side panel top & bottom.
7. Sew the top, 1 side and bottom. Top along the piping - use the zipper foot, side (loop side) and bottom with 1 inch seam.
8. Attach ties on the open side panel and stitch top and bottom leaving 5 inch opening.
9. Turn inside out - your bumper is almost done.
10. Stuff and position panels of foam and you're done. I left the opening as is because I want to be able to take out the foam and wash the cover. You can choose to blind hand stitch it close.
Wednesday, August 19, 2009
Leah's Welcome Gifts
These were made for my niece Leah. She got a whole bunch of the Piggie's hand me downs, thought it would be nice to get something new and handmade : ) The little shirts were trimmed out with ribbon. It really dress up these little side snap tops.
Subscribe to:
Posts (Atom)